Setting up the company structure is an essential aspect within ProPlanner. This structure determines, among other things, the assignment of user rights and the visual representation of the planning. It is therefore important to understand the different levels of this structure and, based on that, make appropriate choices.
In ProPlanner, the company structure is composed of four levels:
- The top level consists of the company group.
- Below that is the company
- Followed by the business unit.
- The lowest level is made up of the pools
A company group can include one or more companies, whereby each company can consist of one or more business units. In turn, these business units can again consist of one or more pools.
DEFINE THE DIFFERENT LEVELS WITHIN THE COMPANY
First of all, we want to emphasize the workflow of the structure. It is important to note that at least one creation is made at each level. Specifically, this means that a new company group must contain at least one company. A company must in turn have at least one business unit, and each business unit must have at least one pool. Creating companies or business units without also providing the necessary levels below is pointless, and these will not be visible in the planning.
1. The company group
The company group is characterized by a composition of different companies, each with their own VAT or CoC numbers. This can be seen as a bundling of various independent companies. In the case of a simple company structure, this can refer to the holding or the company itself. With a more complex structure, for example when there are separately operating entities, acquisitions, etc., each of these separate company groups will have its own company group in ProPlanner.
A company group is provided for the following reasons:
Management of, among others, (a) separate entity(ies)
- Customer database (note that the customer database can also be provided separately per company and business unit)
- Alarm and alert types
- Prices (incl. price ranges, rates, fuel prices, discount reasons and supplements)
- Insurance (incl. insurance profiles, excess, excess waiver insurance rates)
- Checklists
- Cost centres and cost units
- Users
More information about the different levels and their parameters can be found here
When you want to deviate with a certain group of companies for the aforementioned reasons, it is wise to create a new company group. If there is no need to deviate, it is recommended to keep the structure simple by organizing everything under one or a limited number of company groups.
2. The company
As previously indicated, a company group comprises at least one company. Within such a group, companies typically have their own VAT or CoC number. In the case of a simple company structure, where there is only one VAT or CoC number in total, the company group will be the same as that one company.
3. The business unit
The same principle applies here: a company must include at least one business unit. A business unit is no longer distinguished by a unique VAT or CoC number, but by the physical location. A business unit often has an address that differs from that of another business unit within a single company. A business unit can also be a rooftop.
A business unit is set up for the following reasons:
Management of e.g. (a) separate(s)/separa(a)t(e)
- Contracts
- Cash registers
- General ledger accounts
If you need invoice numbering per location or you want to provide the location's address on documents, it is necessary to create business units. Unlike the pools mentioned below, you cannot provide numbering or address details there.
If the company structure consists of a single company with a single address, then the company group = company = business unit.
4. The pool
While a business unit mainly focuses on the physical location, a pool focuses on the logical division. Pools are often located at the same address, but provide a visual separation within the business unit, offering a quick and efficient way to search and work in the planning. Typical examples of pools within a business unit include replacement cars, rental, web rental, body shop, demo cars, bicycles, Z-plates, passenger cars, minibuses, trucks, etc.
A fleet also follows the rule here: "Each business unit has at least one fleet".
It is characterized by the separate management per pool of the resources.
Once the company structure is clear and it has been decided how it will be integrated at the various levels in ProPlanner, the configuration in ProPlanner must still be completed.
SETTING UP THE COMPANY STRUCTURE IN PROPLANNER
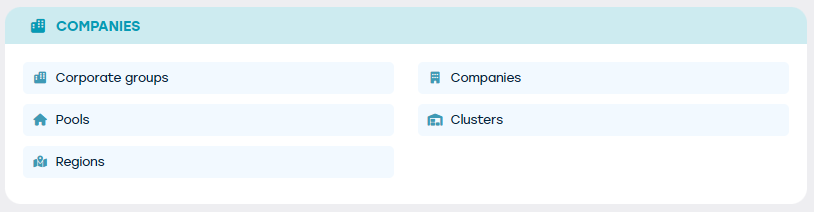
Setting up the company structure can be parameterized via Management > Companies.
It is recommended to start setting up at the highest level, the company group, and finish with the configuration of the fleets.
1. The company group(s)
Note that it is not possible to create and/or modify company group(s) at the company group level itself, as this can only be arranged by ProPlanner due to the additional configuration required. If there is a need for one or more company groups, please contact our support service.
If one or more company groups need to be created, the following information can already be provided in advance:
- Name of the company group(s)
- Terms and conditions at group level in the desired languages (if applicable) - in PDF or Word file
- Specific conditions at group level in the required languages (if applicable) - These are the terms you wish to highlight and explicitly display on the contract.
2. The company
After the company group(s) have been created or modified, you can set up the desired companies. Proceed as follows:
Navigate to Management > Companies > Companies and then click on '+ add company'
The following screen will appear, where you need to fill in the information below. Note that the fields with a yellow icon on the right side are mandatory.
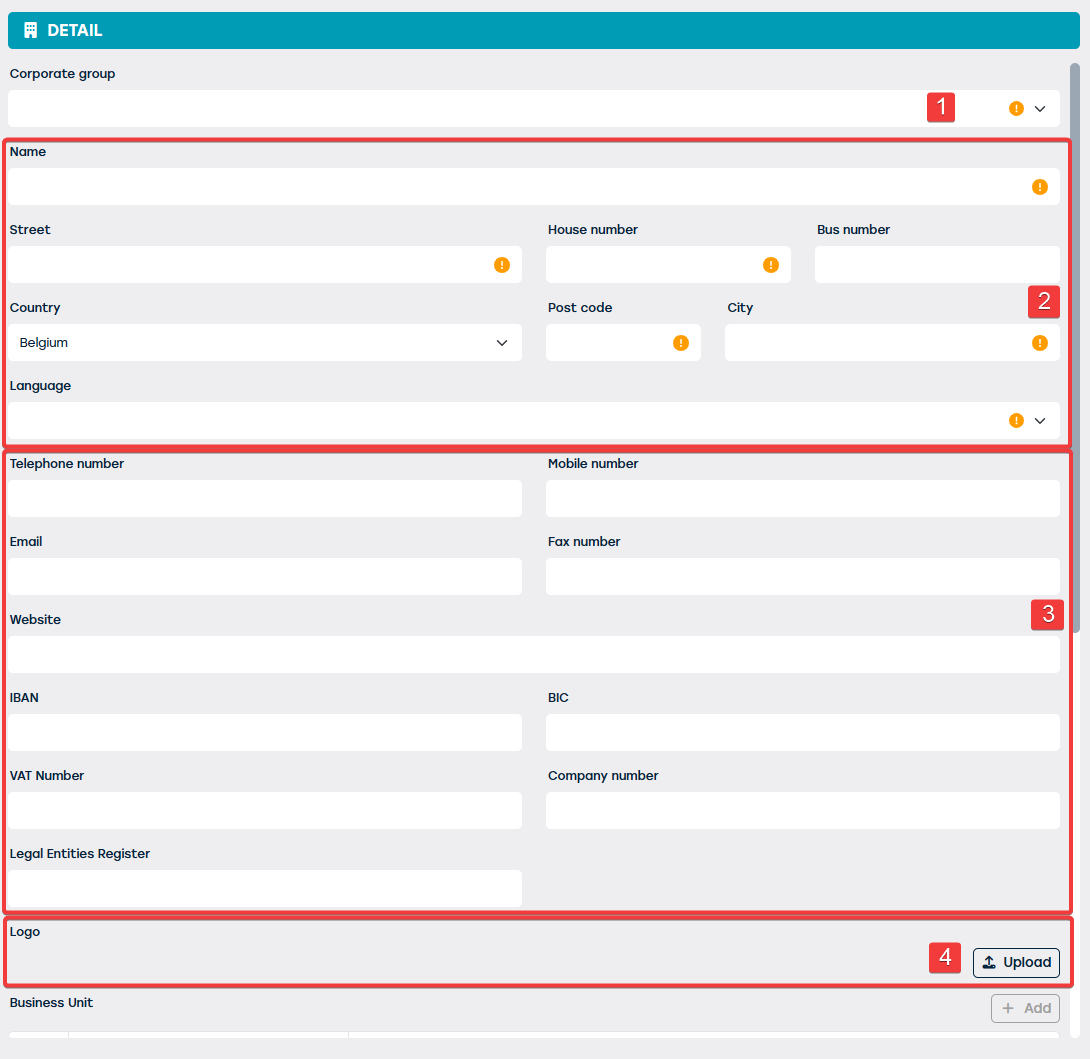
| NR | DESCRIPTION | MANDATORY | REMARK |
| 1 | Via the dropdown, you can choose the desired company group to which the company will belong. | YES | |
| 2 | Enter here the name, address details, and spoken language of the company. | YES | |
| 3 | The following information is not mandatory, but can be added to complete the company''s profile. | NO | NOTE: If the bank account number of this company must be mentioned to the customer on the documents, it is mandatory to provide this number. However, if you want the account number of the business unit to appear on documents, you can set this at the business unit itself (see point 3 above). |
| 4 | If you want a company logo to appear on documents delivered to the customer, you can set it here. | NO | It is important to note that we can also configure a logo at the business unit and pool level. If a logo is set at business unit or pool level, that logo takes precedence. If this is not the case, the company logo will be used. This can therefore serve as a type of backup or fallback logo. |
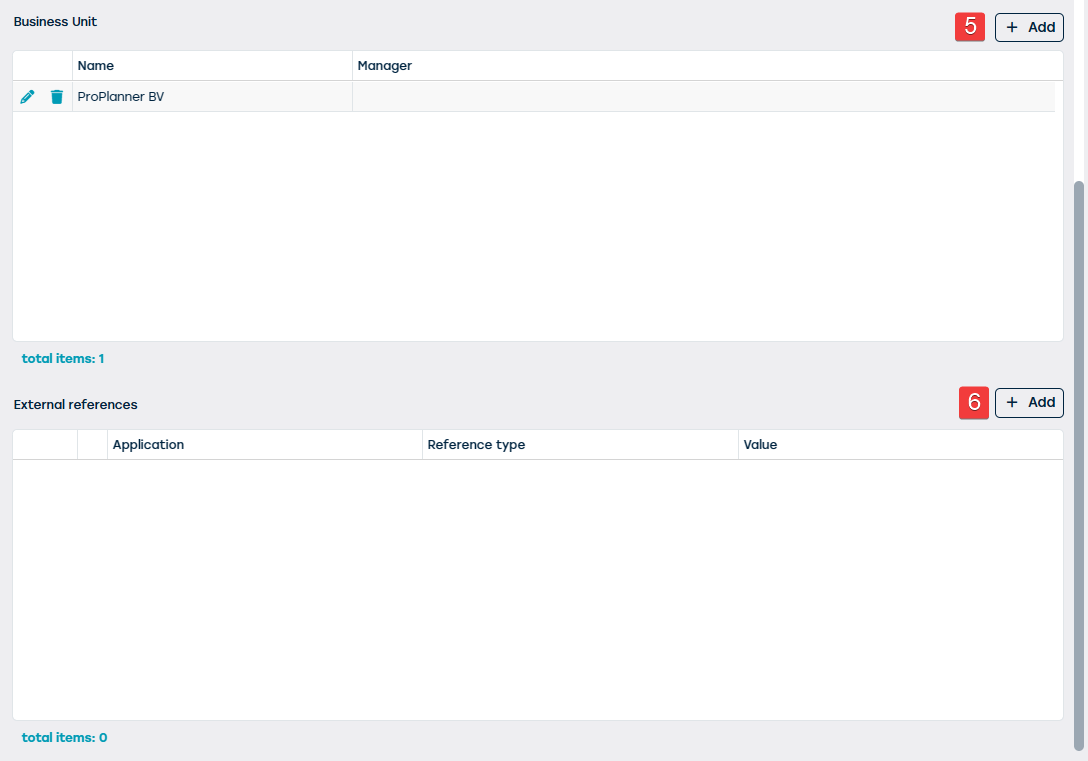
| 5 | Via the ''+ add business unit'' button, you can add one or more business units that will belong to this company. (For more information, see point 3 above).Before you can add a business unit, you must first save the company itself. | YES | Each company needs at least one business unit. The creation of at least one business unit is mandatory. |
| 6 | If integrated with external software, external references may be visible here. | NO |
3. The business unit(s)
As previously mentioned, the creation of a business unit takes place from the company's setup screen. To do so, click the button '+ add business unit' and a new window will open.
The parametrization of a business unit consists of several steps, which are each displayed via a mini tile.
3.1. General
On the 'General' tile, you are expected to enter the following information:
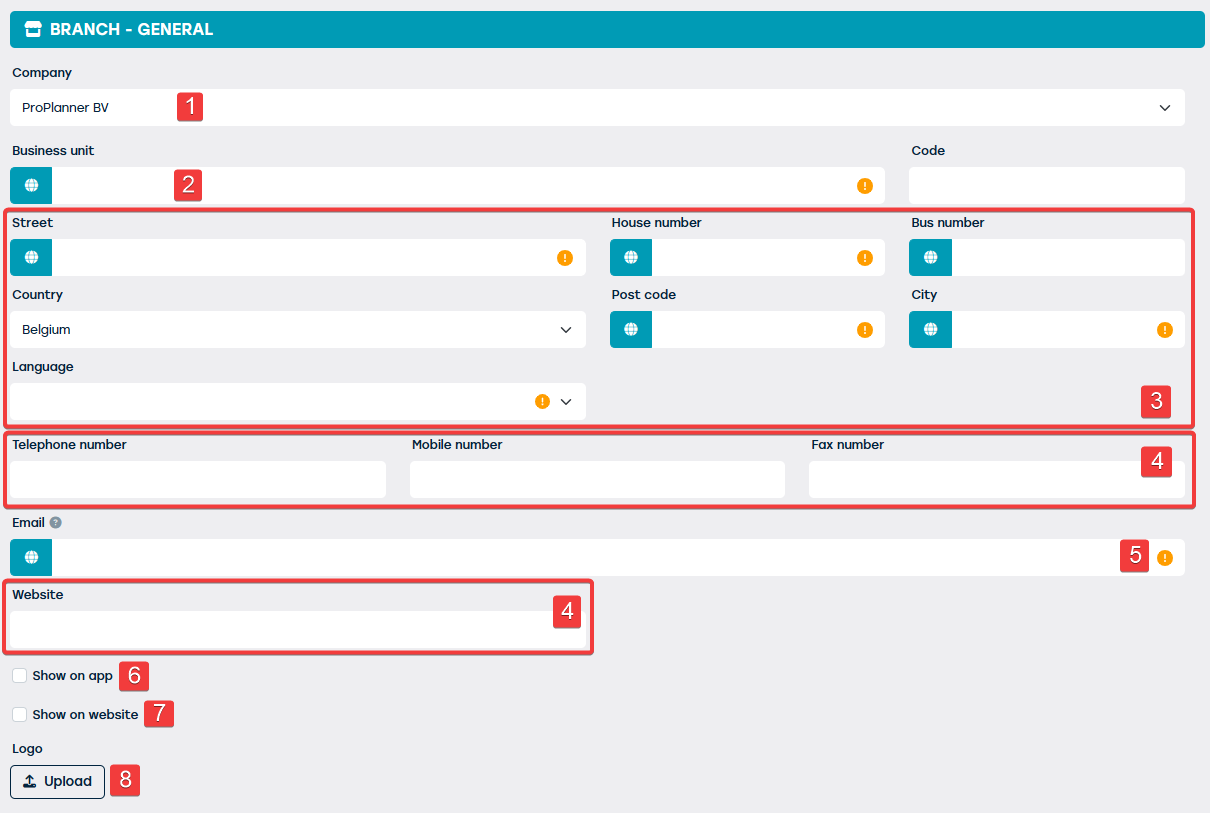
| NR | DESCRIPTION | MANDATORY | REMARK |
| 1 | Normally, the company from which you just created the business unit is automatically preselected. If you still want to change the company, you can do so via the dropdown menu. | YES | |
| 2 | Enter the desired business unit name here; if necessary, translate the name to other languages using the globe. | YES | |
| 3 | The address and language of the business unit can be configured here. The address can be provided with translations via the globe. | YES | This address can, if desired, be shown on the documents. |
| 4 | The following information is not mandatory, but can be added to complete the profile of the business unit. | NO | |
| 5 | Unless otherwise specified (see point 3.3. above), this email address will be used to send emails and documents to the customers. | YES | The email address should preferably be set as a reply address, as customers will likely reply to this address. |
| 6 | Optional: Show on app: This business unit will be shown in the app when this option is selected. | NO | This option is only visible when you use the GoPlanner Module. |
| 7 | Optional: Show on website: This business unit will be shown on the website when this option is checked. | NO | This option is only visible when you use the website integration. |
| 8 | As already mentioned for the company, you can also set a logo for the business unit. This logo takes precedence over the logo linked to the company. | NO |
3.2. Extra
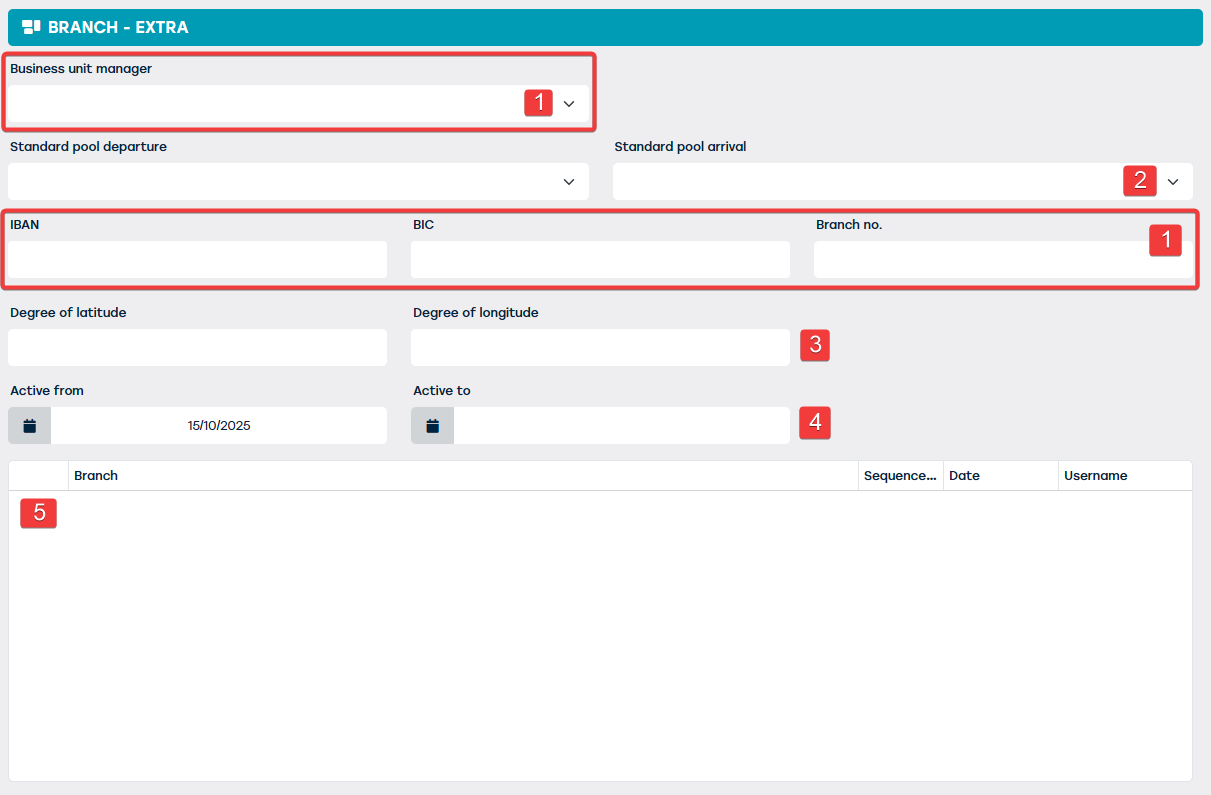
| NR | DESCRIPTION | MANDATORY | REMARK |
| 1 | The following information is not mandatory but can be added to complete the profile of the business unit. | NO | NOTE: If the bank account number of this business unit must be mentioned to the customer on the documents, it is mandatory to provide this number. However, if you want the account number of the company to appear on documents, you can set this at the company (see point 2 above). |
| 2 | Here you can specify a preferred setting. These pools are automatically selected when creating a contract for this business unit. You can manually change this selection if desired. | NO | |
| 3 | The latitude and longitude can be provided here for this business unit | NO | This is mainly used in combination with the website integration and GoPlanner Module. |
| 4 | Here you can specify from and until when this business unit is active. This can be used, among other things, to determine whether or not this business unit can be selected during login, or when creating a contract. | NO | |
| 6 | Optional: Nearby business units: Here you can define and sort the business units that are near this business unit. This information is purely informative and will be sent along if an external application requests information about this business unit via the API. | NO | This option is only visible when you use the GoPlanner Module, API and/or Website Integration. |
3.3. Email settings
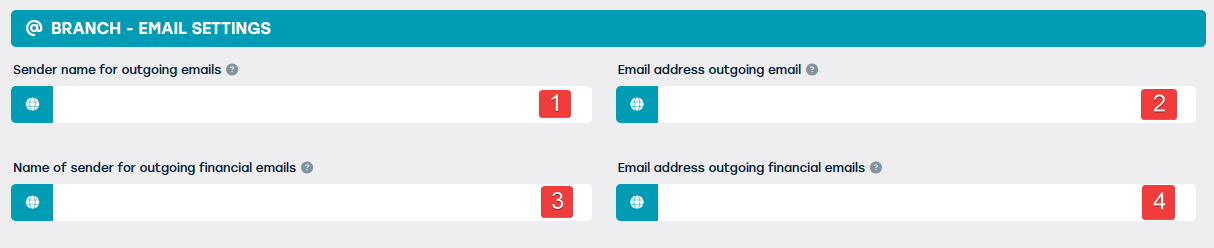
| NR | DESCRIPTION | MANDATORY | REMARK |
| 1 | Here you can define the name that should be displayed as the sender of outgoing emails. If this is not filled in, the name of the business unit will be used for this. Provide translations if necessary. | NO | |
| 2 | Here you specify the email address from which outgoing emails should be sent. If not filled in, the email address of the business unit will be used for this. Provide translations if necessary. | NO | |
| 3 | Specify here the name to be displayed as the sender of outgoing financial emails (e.g. invoices). If not filled in, the system will refer to the sender name for outgoing emails. Provide translations if necessary. | NO | |
| 4 | Here you specify the email address from which the outgoing financial emails (for example, invoices) should be sent. If not filled in, the system will automatically use the email address set for general outgoing emails. Provide translations if necessary. | NO |
2.4. Invoicing
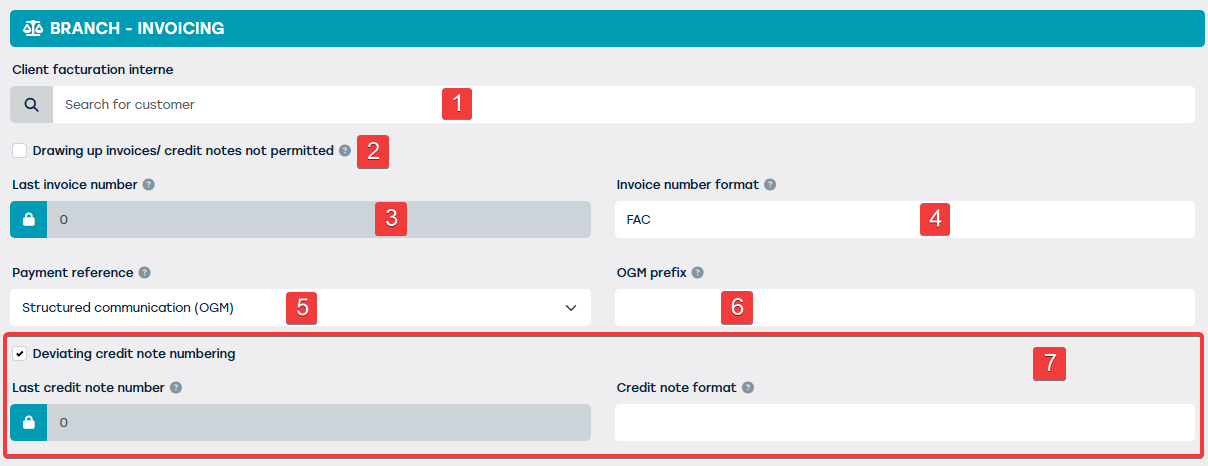
| NR | DESCRIPTION | MANDATORY | REMARK |
| 1 | You should only fill in this field if you want to work with lend-out periods, that is, if you want to rent or lend resources to/from another business unit. Then, to handle the invoicing correctly, an internal customer must be provided here. ProPlanner does not allow invoicing to a ''business unit'' type; this is only possible to a ''customer'' type. Therefore, you should create a copy of the business unit data at customer level. Instructions for creating a customer can be found here. Once the copy of the business unit has been created as type ''customer'', you can link it here. | NO | NOTE: you do not display relationships between business units in this field. This is done in the module for lend-out periods. Here you only specify which customer data from this business unit should be displayed if this business unit needs to be shown on the invoice. ProPlanner takes over the data from the customer you have linked here. |
| 2 | If this is checked, the ability to create an invoice/credit note is NOT available for contracts that have been created for this business unit. | NO | If you do not use the invoicing functionalities in ProPlanner, it is advisable to check this option for all business units. |
| 3 | This number indicates the most recently used invoice number. The invoice number of the next invoice will be the current number plus one (+1). This number increases automatically. | NO | This field is intended for use during the invoicing transition from external software to ProPlanner. Enter here the last invoice number that was used in an external system. NOTE: If you want the numbering to restart with a new financial year, please adjust the number here before the first invoice is created in the new financial year. |
| 4 | In this field, you can indicate how the invoice format should be set up. You can enter free text and characters and also use the options under remark to add tags. | NO | Possible tags: - #J# for journal code - #Y# for year - #FY# for financial year - {5} for the number of digits that must be used |
| 5 | Here you can specify the reference to be passed on to the payment. This can be a structured message or free text. If you choose text, you can define a specific format. | YES | Available tags if you choose free text: - #InvoiceID# - #InvoiceNumber# - #InvoiceSequence# - #CustomerID# - #CustomerReference# - #ContractID# |
| 8 | If you choose a structured message, you can specify the prefix of the OGM message here. | NO | This can, for example, be the business unit code so you can quickly see for which business unit this invoice was issued. If the field is empty, no prefix will be provided. |
| 9 | For a deviating credit note numbering, you can check this option. Steps 3 and 4 can be repeated for the credit note numbering. | NO |
2.5. External
Here, any external integrations that connect with this business unit are displayed. These are set up by ProPlanner.
EXTRA AVAILABLE TILES:
The following tile becomes visible if you use the bookkeeping module:
- 2.6. Accounting
For more information, go to the item ''accounting''
The following tile becomes visible if you use the GoPlanner module:
- 2.7. Access codes
For more information, go to the item ''GoPlanner''
The following tiles become visible when using the Website Integration
- 2.8. Opening hours
- 2.9. Makes
For more information, go to the item ''Website Integration''
4. The pools
Finally, the pools are created. You do this via Management > Companies > Pools > '+ add pool'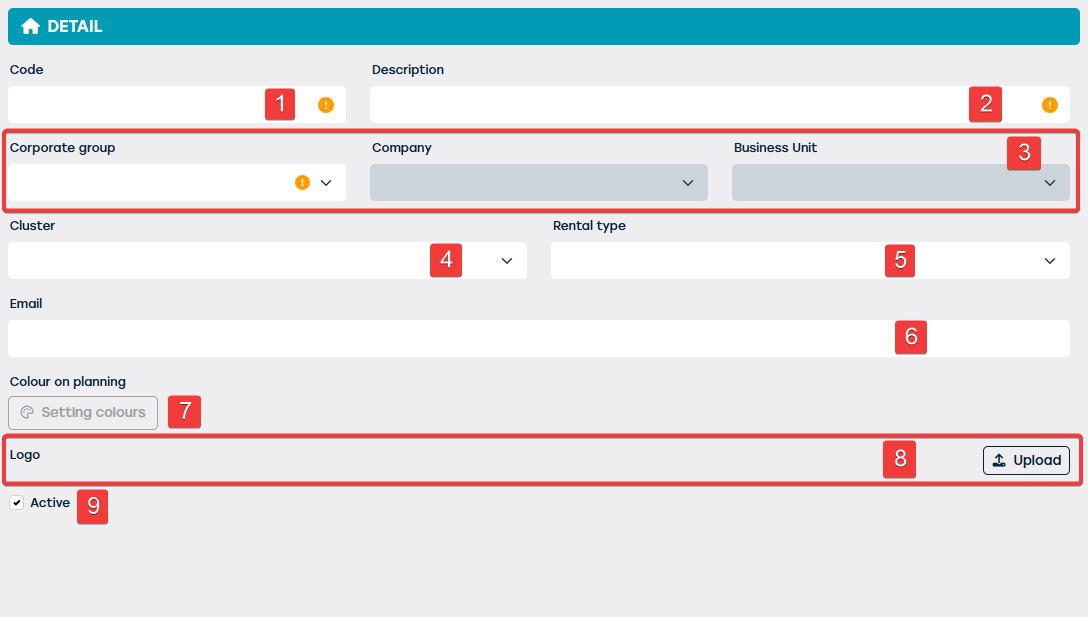
| NR | DESCRIPTION | MANDATORY | REMARK |
| 1 | Here you can specify a code that will be displayed on the planning. Choose a short code/abbreviation consisting of a maximum of 5 characters | YES | |
| 2 | Enter a name for the pool | YES | |
| 3 | Determine the company group, then the company, and finally the business unit to which the new pool will belong | YES | |
| 4 | Optional: In addition to the already known levels in the company structure, you can also add groupings (clusters). These clusters are composed from a combination of pools. Before you can designate a cluster here, they must first be created. You can find more information at point 5 above. | YES | |
| 5 | This is a preference setting. If you want a specific rental type to be selected automatically when creating a contract for this pool, you can specify that here. You can still adjust this at any time. | NO | |
| 6 | Here you can provide an email address specifically for this pool. | NO | If desired, this email address can be included on the documents you provide to the customer. Please notify us so we can provide this in the templates. |
| 7 | Optional: It is possible to choose to display all bookings in the planning of a specific pool in the same color. | NO | NOTE that colors can also be set per rental type. |
| 8 | As mentioned earlier, a logo can also be provided at this lowest level. | NO | NOTE that ProPlanner will first display the logo that was set at the lowest level (pool). If that logo is empty, ProPlanner then looks at the business unit, and lastly at the company. |
| 9 | Here you can indicate whether the pool is active or not. | YES | Please note that when you set the pool to inactive, this pool can no longer be selected when creating resources, nor is this pool visible in the planning. (Unless you also select the inactive pools in the planning filters) |
5. The clusters
Would you like an extra grouping at pool level? That is possible. With clusters, you can organize pools across different business units. If, for example, you want to group all your rental pools separately and also create a cluster with all body shop pools, you can do that here.
To do so, go to Management > Companies > Clusters
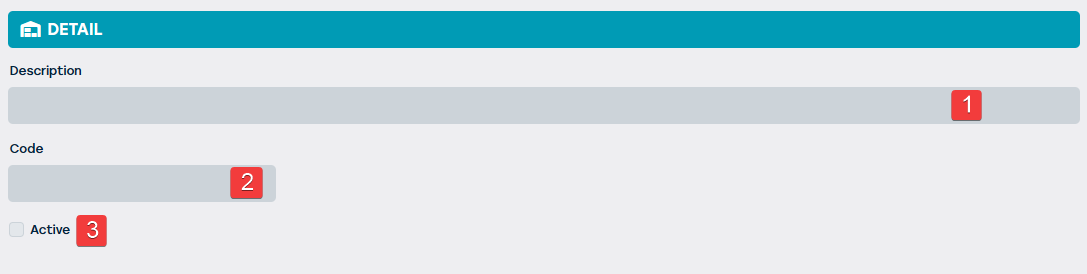
| NR | DESCRIPTION | MANDATORY | REMARK |
| 1 | Display the name of the clusters | YES | |
| 2 | If desired, a code can also be used | YES | |
| 3 | You can further indicate whether this cluster is active or not | NO |
Once the clusters are set up, you can assign them to the pools as described in step 4.Pools step 5